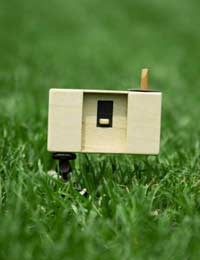
Make Your Own Pinhole Camera

Making a pinhole camera is a great way to explore the basic principles behind photography. These days, digital cameras tend to do all the difficult work, helping people to take better quality pictures.
However, pinhole cameras are one of the crudest ways to photograph a scene, individual or landscape. Using a pinhole camera will help the user to explore fundamental basics of photography, such as exposure and composition, enhancing their overall photographic skills.
Pinhole art is a distinctive and recognised style of photography, something else that can be also explored and experimented with.
This article explains how to make your own handmade lensless pinhole camera using a tin can or cereal box, and using roll or sheet film.
What You’ll Need
- Cereal Box or Small/Medium Can (ideally with Plastic Lid)
- Black Paint
- Heavy Duty Aluminium Foil
- No. 10 Sewing Needle (1/75” diameter)
- Black Heavy Weight Card
- Black electrical tape
- Roll Film or Photographic Paper
- Safety Light (or red cellophane)
How To Make a Pinhole Camera
First you will need to find a cylindrical container or rectangular box with a plastic lid. The container must be made light-proof – to do this, you’ll need to paint or spray the inside of the container with black paint. You should be aware that any light that leaks into the container will ruin the exposure and the final image. For this reason, you should make sure that any holes in the box or container seams are covered with black electrical tape once the paint or spray has dried.However, you should also bear in mind that you’ll need a removable lid, so that you can access the roll film inside the camera. It is therefore best to create an overhanging seal around the container lid, to ensure that once the lid is on, no light can get in. This can be done with black card or electrical tape.
Making the Pinhole
The pinhole effectively acts as a normal lens would in a ‘normal’ camera. Because the pinhole lets in so little light, pinhole camera exposures take much longer. This is the reason normal cameras have larger lenses, so that exposure times can be greatly reduced.Although you can make a hole in your container, the easiest way to make the pinhole is to take some heavy-duty aluminium foil, and gently rotate a No. 10 (Or No. 8) needle in the foil to create a smooth, even pilot hole. You can then use a drill with appropriate sized drill bit to create the finished hole, and sand with a fine grade paper if needed. If you can’t find any heavy-duty aluminium, you could always try the above method with thinner aluminium sandwiched between two pieces of card.
You will then need to drill a quarter to half-inch (approx. 1.3cm) hole in the side of the box or container, making sure to remove any rough or frayed edges. The aluminium aperture hole should then be centred and attached around the hole cut into the side of your box or container.
At this point, you’ll again have to make sure that no light is able to leak through the attachment (other than the aperture hole!), so tape around the edges to securely attach and light-proof it.
The last part of the camera construction is making the shutter. This is simply a piece of rigid black card, hinged on one edge by sturdy tape. The shutter can be kept closed with another piece of tape that falls over the aperture hole when not in use.Test Your Pinhole Camera
When making a pinhole camera, it is vitally important to test before use. To test your pinhole camera, you’ll need to load the camera under a safety light. If you don’t have a safety light or darkroom to hand, you can place several sheets of red cellophane around a battery torch or flashlight.You can either use blank roll film or, more easily, photographic printing paper to test your pinhole camera. Load the camera by placing a cut out piece of roll film (must be cut and loaded in total darkness) or paper (under a safelight) into your container or box, and tape securely in place opposite the pinhole. Make sure your shutter flap is closed and then take the camera outside.
You can then ‘open’ the shutter and expose the paper or film to daylight. The exposure time will depend on the paper or roll you use. Usually, photographic paper will need no less than 2 minutes exposure, whereas roll film will require anything from 2 to 4 seconds exposure time. You should take the time to experiment to achieve the results you want.
If using roll film, make sure that you remove the film under total darkness before processing in the normal way. The paper should be developed as normal, and if you have light-sealed the camera properly, no foggy marks or patches should be apparent, and you have just successfully made your own pinhole camera!
- Make Your Own Birthday Cards
- Make Your Own Fabric Flowers
- Make Your Own Valentine's Gifts
- Make Your Own Wedding Favours
- Make Your Own Tablecloth and Napkins
- Make Your Own Website
- Make Your Own Christmas Crackers
- Make Your Own Halloween Costumes for Kids
- Make Your Own Christmas Stocking
- Make Your Own Musical Instruments
- Make Your Own Perfume
- Make Your Own Guitar Strap
- Make Your Own Puppets
- Make Your Own Embroidery Patterns
- How to Make Your Own Natural Fabric Dyes
- Quick and Easy Handmade Invitations
- Simple Curtains to Make Yourself
- Make Your Own Cushions
- Make Your Own Recycled Paper
- Make Your Own Gift Wrap
- Make Your Own Jewellery
- Make Your Own Pot Pourri and Air Freshener
- Make Your Own Tote Bag
- Make Your Own Recycled Art Supplies
- Make Your Own Play Dough
- Make Your Own Easter Decorations
- Make Your Own Christmas Decorations
- Make Your Own Mosaic
- Make Your Own Candles
- Make Your Own Washing Powder & Fabric Conditioner

Re: Make Your Own Deodorant
Kak esehiko sminor k112 makingyourown.co.uk
Re: Make Your Own Cat Litter
Why on earth is cat litter under Food Projects?? Also why is a British site giving recipes in cups?? I'm so confused.
Re: Make Your Own Cosmetics
I’m interested in starting my own makeup like but unsure how to go about it please can you help
Re: Make Your Own Cosmetics
I’m interested in having my own makeup line and I’m not sure how to start and go about it. Can you please assist me? Thank you
Re: Make Your Own Cosmetics
Hi I just wanted to get some infomation on how to start my own beauty brand and how much would it cost to make my own beauty line thank you
Re: Make Your Own Sloe Gin
I'm a newbie with sloe gin....made some fortnight ago and upon shaking just now I seem to have white bits floating around...is this…
Re: Make Your Own Tea
Hi I’m wanting to blend my own tea pack and label it in small amounts Can you do this
Re: Make Your Own Washing Powder & Fabric Conditioner
I have been making my own washing powder for about four years now and I use DriPak products, but…
Re: Make Your Own Washing Powder & Fabric Conditioner
Estelle - Your Question:What are the ingredients for making Washing powderOur Response:The detai
Re: Make Your Own Washing Powder & Fabric Conditioner
What are the ingredients for making Washing powder