Make Your Own Barbeque

Barbeques are synonymous with summertime - the smell of burgers and sausages sizzling away on the grill are enough to conjure up images of relaxed, sun soaked evenings spent with family and friends. Of course, the barbeque itself is central to these sorts of gatherings, and a poor barbeque can spell disaster!
Although Britain is not known for it's reliable sunny weather, as a country we still enjoy many days of perfect barbeque weather. So to save you wheeling a cumbersome barbeque in and out of the shed, why not have a permanent barbeque in situ, ready for action? A static barbeque could easily be incorporated into a larger garden design, and form an integral part of a dedicated eating area.
Before You Begin
The brick barbeque described in this article will be made from bricks and mortar - therefore if you haven't had any brick-building experience, perhaps it's best to buy your materials and practice beforehand. Of course, another option is to rope in a relative or friend that could help you out!You'll also need to choose your barbeque location carefully. This is largely because of the smoke from the barbeque - you may want to have a barbeque, but it doesn't mean that they will necessarily want smoke billowing into their garden or house! You should try and think about where the wind most commonly prevails from, and try to site your barbeque accordingly.
Also consider the distance from the kitchen to the barbeque. You don't want to be trekking to and from the barbeque each time you visit the kitchen.
What You'll Need
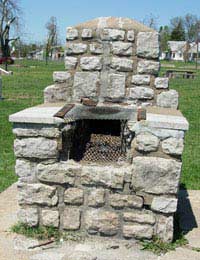
You need to have a fairly solid idea of what your barbeque is going to look like, and how high you want it to be. The grills should be placed at a comfortable working height, which is usually around 30 inches/76 centimetres from ground level. The barbeque firebox itself will then need to be situated around two brick courses below. This roughly translates to around 5 inches below the grill.Will you want any shelving areas? If so, you'll need to factor in around one to one and a half feet on either side of the barbeque. Once you have your basic design sketched out, you can work out how many bricks and how much mortar you'll need.You'll also need to buy loose wire grills and a fire pan or fire bricks before you start building, as you don't want to come unstuck with a grill that's too large or small!
In addition, you may find that you need to hire out a brick cutter, but this depends entirely on your design. If you have few brick cuts to make, you could opt for a simply mason chisel and hammer. Finally, you'll also need to source ready-mix cement for the barbeque base. Generally it's best to opt for a design of around 4 foot square.
Barbeque Foundations
Because you're building with bricks, you'll need suitable foundations to stop the whole thing toppling over! You may find that your foundations will require some reinforcing with a wooden frame, and pieces of rebar. Rebar are basically ribbed steel bars that are placed in foundations to strengthen any concrete.You'll probably need to use treated timber around 6 inches wide, creating a 'frame' inside the 4x4ft foundations. Then mix up your ready mix cement - you'll need enough to fill about a total of 6 inches for your barbeque foundation.
Pour in half of the concrete into the foundations (around 3 inches), and then place a series of 6 inch rebar about a foot apart from each other. This will help to reinforce your cemented base. Make sure that the surface is level and smooth before pouring in the remaining 3 inches of cement, this time incorporating a very slight gradient to aid any rainwater drainage.
Depending on the ready mix cement instructions, you may need to wait up to or over 24-48 hours for the cement to set before continuing with building the barbeque. During this time you can thoroughly soak your bricks with a hose, so that any mortar will not dry too soon once you begin laying the bricks.
Make Your Own Barbeque
You want to get a good idea of where your first mortar line will be before you start making your own barbeque. The easiest way to do this is to lay the first couple of courses of bricks (without mortar) onto the concreted foundation. Then using a thick pencil or charcoal, draw the outline around the bricks.You can then remove the bricks and begin laying the first bed or mortar. You can readily buy ready mix brick mortar from a DIY store, and mixing instructions will depend on the manufacturer's recommendations. But generally, you're aiming for a soft, malleable consistency like mud. It's really important that you get the first level right, as it will set a precedent for the straightness of the rest of your barbeque!
Try and get around ½ inch (approx. 1.75cm) of mortar between each brick and each layer, making sure that any excess is removed. Once you've laid the first couple of levels, you can start adding the mortar into the corners of the walls. Check regularly that your walls are level both horizontally (with a spirit level) and vertically (with a plumb line).
Once you reach your level where the fire box and grills will be placed, you can insert four short pieces of rebar between the brick courses. These will act as shelf handles to support the wire grill and fire box.
Allow a further 48 hours or so for everything to set before you start using your barbeque. You may want to give your barbeque a test run before you invite friends and family over for the inaugural barbeque event - and then you can encourage them to make their own barbeque too!
- How to Make Your Own Car Windscreen Cleaner
- Make Your Own Recycled Wooden Planter
- A Kitchen Herb Garden for all Garden Sizes
- Make Your Own Medicinal Herb and Flower Garden
- How to Make a Green Roof for Your Shed
- Make Your Own Organic Fertiliser
- Make Your Own Compost Heap
- Make Your Own Planters and Pots
- Make Your Own Insect Repellents
- Make Your Own Organic Compost
- Make Your Own Cloche & Mini Greenhouse
- Make Your Own Potato Planter
- Make Your Own Salad Box

Re: Make Your Own Deodorant
Kak esehiko sminor k112 makingyourown.co.uk
Re: Make Your Own Cat Litter
Why on earth is cat litter under Food Projects?? Also why is a British site giving recipes in cups?? I'm so confused.
Re: Make Your Own Cosmetics
I’m interested in starting my own makeup like but unsure how to go about it please can you help
Re: Make Your Own Cosmetics
I’m interested in having my own makeup line and I’m not sure how to start and go about it. Can you please assist me? Thank you
Re: Make Your Own Cosmetics
Hi I just wanted to get some infomation on how to start my own beauty brand and how much would it cost to make my own beauty line thank you
Re: Make Your Own Sloe Gin
I'm a newbie with sloe gin....made some fortnight ago and upon shaking just now I seem to have white bits floating around...is this…
Re: Make Your Own Tea
Hi I’m wanting to blend my own tea pack and label it in small amounts Can you do this
Re: Make Your Own Washing Powder & Fabric Conditioner
I have been making my own washing powder for about four years now and I use DriPak products, but…
Re: Make Your Own Washing Powder & Fabric Conditioner
Estelle - Your Question:What are the ingredients for making Washing powderOur Response:The detai
Re: Make Your Own Washing Powder & Fabric Conditioner
What are the ingredients for making Washing powder